Updated: December 10, 2025
Applicable Role: Company Managers
Prerequisites:
- WAVE Interactive account
- Permission to create one (If you believe you should have the permission, please reach out to support HERE)
Step-by-step guide:
1. Log into WAVE and go to your main Dashboard. Under the "Custom Courses" section you will see the "Files" drop down. You will want to click on that and select "Upload Files".
Note* Be sure to give it a unique name so it is easier to find!

2. Here you can upload any files you will need. To upload a file you will need to click on the green "Upload" button and then drag n' drop your files into the upload box.

3. Once your files have been uploaded you will need to go back to your "Dashboard". On the "Dashboard," we can now create a "Custom Course" to act as our E-Signature. You will need to click on the "Create New Course" link to get started.

4. To set up the course for an E-Signature the "Course Type" will need to be set to "Custom Course"
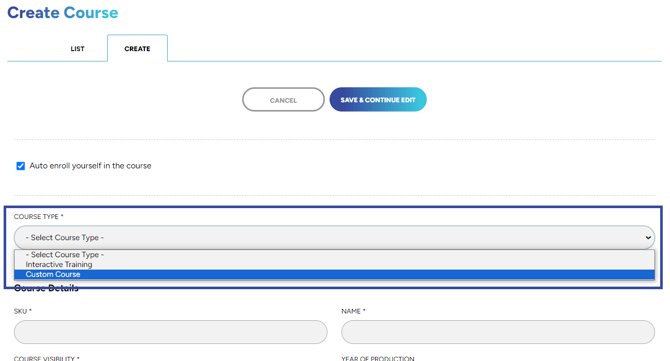
Set the "SKU" and "Name" whichever way you would like.
"Couse Visibility" should be set to "Visible"
"Year of Production", "Runtime", "Passing Score", "Thumbnail", and "Description" can be set however you would like.
Once completed make sure to click "Save and Continue"!
5. Once the Custom Course has been created, we will need to navigate to the "Sections" tab and click the green "Create Course Section" button.

Here we can title the section anything we would like then navigate to the "Course Section Type", select the "Uploads" section type, then select your file in the dropdown.

Once you have the section filled out as needed we can click "Save".
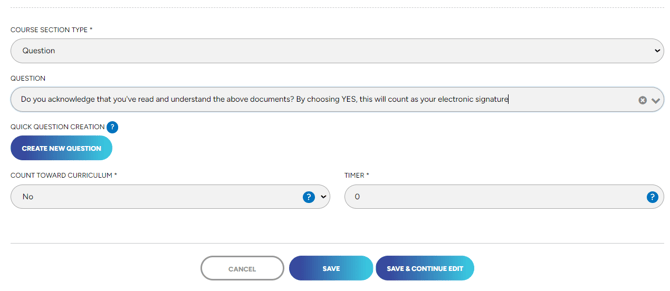
6. Now that we are back at the "Sections" tab we will need to create one more "Course Section". this will be our "E-Signature" section.
Title: E-Signature
Content: Add in anything you would like
Course Section Type: Question
Once you set the "Course Section Type" to "Question" you should see a "Quick Question Create" button. Click on the orange "Create New Question"

7. Here we will create our digital "E-Signature".
Question Type: Multiple Answer
Question: Do you acknowledge that you've read and understand the above documents? By choosing "YES", this will count as your electronic signature
Correct Answers: YES, NO (if you would prefer to put NO in the incorrect answers location you can)

Click "Save" when you are done.
8. Set the newly created question for the section, then click "SAVE"
9. Once the "Custom Course" has been completed you can now assign it to any learner you will need an E-Signature from.
"If you need further assistance after reading this article, please submit a ticket HERE and someone from our team will assist you soon!"